Sunday, October 9, 2011

Patterns With a Following

I have steered clear of most commercial patterns for clothing for some years now, after my earlier attempts were not so successful. Of course part of this was no doubt my inexperience, however, the taste left was so bitter, I've turned away and not looked back. Instead, I've had the opportunity to grow my own skills in pattern drafting. I've been happy with the results usually, though more effort is needed to get a finished garment. Being a busy mom, I don't always have the time to make my own patterns, and at times like these, I am very grateful that there are quality pattern companies out there that make easy,  understandable, and beautiful patterns.

I'm going to take the plunge and try out Colette Patterns, like every other sewing lady out there. They have almost a cult following. Most blogging sewists I've seen have not done just one pattern, but several, and often the same pattern several times over again! These patterns get rave reviews. Just by reading on the company's blog, I've learned sewing tips that I had not known before. Reading it reminds me how much there is still for me to learn in the art of pattern drafting and couture garment sewing. I'm willing to keep trying, but until I'm able to draft all my own patterns, I'm sure glad I've found Colette Patterns to make my life a whole lot easier!

The first (and only) pattern I own from CP is the lovely Crepe, which is a cool twist on the ever-popular wrap dress. Instead of wrapping in the front, it wraps in the back.

The next pattern I am planning to try is the Jasmine. To be honest, when I first saw it, I wasn't inclined to really think it would be a pattern I'd like to make. But then, I saw this version that Sarai (owner and artist behind Colette Patterns) made for herself, and I was sold almost instantly.

Ok, so ends my discussion on Colette Patterns. Thank you for hanging around (if you did!)

~Ruth

Saturday, October 8, 2011

A bag I loved...

This bag was the sister of a bag I'd made a few days earlier for a friends baby shower. I loved that one so much, I decided to make another one. It ended up going to a very special friend who babysat for us when no one else was available...Thank you again!!! This friend tells me she loves her new bag and I'm so glad! I really enjoyed making it!

This bag is reversible. One side is chocolate brown corduroy and the other is a gorgeous teal plaid that has metallic threads going through it....so fabulous!! The accent fabrics are scraps from Anna Maria Horner's Garden Party line. I've been hoarding these scraps and this was the perfect project!

Here's the pics:


With the two pockets on the inside and the sweatshirt-style pocket on the corduroy side, it is nicely organized, yet roomy for whatever else you may need to carry around in it.

The next bag I make will be similar in style, but made from silk dupioni. It will still be interlined and probably reversible, but I love how strong, yet thin dupioni is. All the stuff I haul around is heavy enough, I need a bag that is light weight.

In fact, my next bag after this corduroy one was in fact from silk dupioni. It's the bag I'm currently carrying right now as a purse. Here's some pics:


This bag is only a single layer of silk dupioni, and it can scrunch up into it's own little attached pouch a-la-reusable-bag-style. This is what happens when you get a woman who has a penchant for both reusable bags and natural fibers. This is my second reusable bag style in silk. The other one I have been using for over two years and it still looks brand new. Seriously...silk is the bomb! It's so durable! The other one was black for the body and the strap was the same strap fabric as this one. I adore it, but I wanted an adjustable strap, a smaller body, and more fun colors. (the first bag was a replica of my favorite reusable bag...Flip and Tumble. While it's great, the bag is quite large. I didn't need it to be that big for my every day bag).

The strap on this bag is all one piece, also creating a gusset and side panels for the body of the bag as well. On the opposite end is a fabric loop to tie the strap to. What I love about this is that the strap can by tied at any length I need. Usually it's tied short, to be a shoulder bag. But when I'm out shopping, I can quickly retie it to a cross-body bag and be hands free. The width also distributes the weight on my shoulder quite nicely. (Does it show that I used to be a babywearer? lol!) I <3 this bag!

So, why am I still planning another bag, if I love this one so much? Well, I need pockets. Something this one doesn't have. Yes, I could have added them, and almost did, but I just loved the fabric so much as it was. However, despite my organizing in zippered pouches, it still tends to be a "black hole" and I am constantly fumbling to find my phone, wallet, or glasses case ( I clip my keys to the fabric loop, so I never have to hunt for those). So, while I'll still use this bag regularly I'm sure, I'd like to try out a more pocketed version w/ a little more substance to it, but still keeping it light-weight. It's a challenge I am eager to meet!

~Ruth


Wednesday, August 10, 2011

A Silk Skirt and Lessons Learned

Last month, we had dear friends get married. Only two weeks before that, we had been in Wichita, Kansas, visiting my family. During that trip, my sisters and I had a girls' night out in Kansas City. Amongst all the lovely shops in the Plaza section of the city, I hardly expected to find a fabric store. And certainly not a fabric store that sold high-end, luxury fabrics! In fact, when I saw "Kaplan's Fabrics" on the map, I couldn't believe it, and had to call the store to make sure I wasn't going on a wild-goose chase! Fortunately, it was not in vain. Indeed, Kaplan's Fabrics is what all fabric stores should be...filled with fabulous fabrics from ceiling to floor, from wall to wall. I had been there for quite a while and was still finding bolts I hadn't seen on my first tour of the store. The owner knew the fiber content and price (along with the story of where it came from) for every single bolt of fabric in the store (I know, because I think I looked at almost every one!) It was amazing. Truly one of my favorite fabric stores of all time. Well, I certainly couldn't leave such a store with out buying some fabric...this is me, after all!

I determined that the gorgeous silk (scarf-weight) fabric should become a skirt that I could wear to the wedding we had coming up. I knew that I'd only have one week once we got home from vacation to draft the pattern, test it, and then sew up the skirt...not to mention I had no idea what to wear as a top with it. A tall order? Yes. But I did manage to pull it off, but not without some tears and wondering why I had gotten myself into such a position before it was done!

Here's the result:


I cannot believe I'm showing a picture of my backside, but you can see the fabric better in this one, as well as the corset lace-up in the back (and one of my "lessons learned")

It's hard to see in the pictures, but this fabric is sheer in the black parts and shiny in the printed sections. This creates very fussy fabric to sew with.


Overall, I'm happy with the skirt, but it is definitely home to a multitude of flaws. And while I may not be experienced enough of a  sewer to create a flawless silk georgette skirt, I DO know that most people won't ever notice, let alone care if it isn't perfect. And so I wore it, and I felt beautiful with every swish of silk as I walked and danced:)

The basics of the skirt design: It's a bias cut half-circle skirt, with a yoke and invisible zipper. It is lined in 100% silk lining fabric (also from Kaplan's). It was cut in four pieces: front, back and front and back yoke. Same for the lining. It also has my signature corset lace-up back, for adjustability. I just can't convince myself to make clothes that aren't adjustable somehow. I hate not being able to fit clothes I sew.

"Lessons Learned"
This next part is mainly for my own benefit, so I don't forget the mistakes I made and how I could have avoided them. Since this blog is to document my sewing projects, I am putting this in here as well. I will always know where to find the information in the future. It just may help someone else too, if they should happen to ever be so bold as to fall in love with gorgeous silk georgette fabric and decide to make a skirt from it in a week's time. I can't be the only one!

In planning this skirt, I was a good little sewer and I tested my self-drafted pattern on other light-weight fabric (a cotton lawn that I didn't care for the print of). All seemed to be well. Good. I thought I should be good to go. Not so fast, there Speedy! This is SILK GEORGETTE we're talking about. Not a fabric to be dealt with like any other fabric. THIS is the GOOD STUFF. However, I was far too inexperienced with it to handle it properly, and believe me, I THOUGHT I was being careful. 

Lesson #1: Cutting the fabric on a bias fold. Not smart. I had cut the cotton lawn this way. I had even cut the two pieces of silk lining this way. All had been well. But I way underestimated the shift-ability of this sheer fabric, and it shifted while I cut, creating a back piece that was about 5 inches shorter than I had intended. 

This created a minor heart-attack when I realized what had just happened. There was no getting more fabric. I couldn't scrap this skirt...the fabric had cost too much, and I had put too much time and effort into it as it was. Plus, I had nothing else I felt comfortable wearing to the wedding.

I began brainstorming ideas to fix it or fudge it. Nothing seemed ideal. In the end, I decided that I might  be able to get away with doing nothing. But I wouldn't know until I finished the skirt and got to the hemming of it. I decided that I wouldn't worry about it until then. Thankfully, I was right. I was just able to get by with the length that I had (Though I DO wish it had been even an inch longer). I still am considering adding a flounce to the hem of the lining (in the outer skirt fabric, since I still have an extra half-yard left). But whether I actually do it, remains to be seen. 

Lesson # 2: No darts in originally. I had hoped to create a yoke pattern on the bias that did not require darts. Once the skirt was assembled, it was clear that this was not a good idea. So, I went back, unpicked a whole lot of stitches, and added darts to the front yoke. This helped enough so that I didn't have to do them in the back, though now I can see (especially in the close up picture of my backside), that back darts will help the top of the corset lacing to not be pulled so tightly (and give room to tighten it in case I lose weight). I may have to go back and add those too.

Lesson # 3: Have wonderful friends who will come and help you when you can't do something yourself!  I could not possibly have hemmed this skirt without the help of a dear friend (you know who you are!) I called her husband (since I didn't have her cell phone number on hand), the day before the wedding and left him a message to have his wife call me back quickly. I didn't want to scare her, but it would do no good for her to call me back at 9 o'clock at night. I needed her help, and I needed to know if she could or not quickly. Thankfully, she responded very fast, and was super willing to come over and help me pin up the skirt for hemming. I heart her! 

Lesson # 4: If you are going to get in over your head making a skirt with slippery silk fabric, make sure the fabric is gorgeous enough to hide all the mistakes. Despite all the flaws, mistakes and imperfections in this skirt, I did receive compliments on it. Most of them said they would never have guessed that I hadn't bought  it. I think that is a compliment. One random male-friend (about the age of my father), told me I looked "gorgeous" that evening. I was a little embarrassed by this, but flattered none-the-less, I admit. And of course, my own dear husband praised the finished result and said he was quite proud of me...music to my ears! I love you Hon!

Miscellany Lessons:
* Use new, sharp, fine tipped needles in your machine. 
*Do NOT attempt to serge. Even with the fine, new needles in your serger. Sergers like to eat silk georgette. At least mine does. 
*Pin like crazy, and watch out for pins that fall out of the fabric. 
*Finish seams with a tight zig-zag stitch in the seam allowance. 
*Hand wash or wash on extra-delicate cycle in machine and hang-dry.

And so that ends my lessons on sewing with silk georgette fabric. I hope these tips can help others in the future, and myself as well! I don't want to make the same mistakes twice!


Tuesday, August 9, 2011

Felted Wool Water Bottle Holders and Tutorial to Make Your Own!

So, I had said I write a post about the water bottle holders I've been making. I admit they are very addicting to make, since they knit up so quickly!


They are made with 100% wool roving yarn (also called single-ply bulky sometimes). I've been buying it at JoAnn's, but most yarn shops (brick and mortar as well as online) have some, though the colors are sometimes limited. I've been using size 10 1/2 DPNs, then switching to circulars. But you can do the entire thing on DPNs if you prefer. I'm also planning on experimenting with size 9 DPNs for the ribbed section on top, since it still has a tendency to not felt up as tight with the rest of the piece.

Here's a completed holder, before it's been felted. This is a 40 oz Klean Kanteen bottle, which it is made to fit.


The pattern is my own design, and it's very simple.

This is intended to fit standard 18-27 oz Klean Kanteen stainless steel water bottles. 

Materials:
size 10 1/2 Double Pointed Needles ( you can do the entire thing in 10 1/2 DPNs, or you can use a smaller needle size for the ribbed section. I've used 10 and am experimenting with size 9. Also, you may wish to switch to circulars after the first 5 or so rows. I find it much easier to start on DPNs, due to the number of stitches being cast on.)

Cast on 40 stitches (48 st for a 40 oz bottle)
Rnd 1: K2, P2, continue to end of rnd.
continue to work in 2x2 rib for 15 rnds.
Knit 40 rnds in stockinette (55 rnds for 27 and 40 oz) 
(I have not made any holders for the 12 oz, but my guess would be at this point to knit 20-25 rnds, after the 15 rib)

To form the bottom:
Begin decreasing: 
Round 1: k8, k2tg. Repeat to end of rnd (k10, k2tg, repeat to end of rnd for 40 oz)
Round 2: k7, k2tg, repeat to end of rnd (k9, k2tg, repeat to end of rnd for 40 oz)
Round 3:k6, k2tg, repeat to end of rnd (k8, k2tg, repeat to end of rnd for 40 oz)
You get the idea here, right? Keep decreasing the rounds until you have only one stitch left. Knot it and weave in the ends.

There. Now comes the felting. Now I know I do not necessarily do it the "right" way. But it works for me, and it's easy-peasy. I throw it in the washing machine on a hot/cold, delicate cycle with one rinse and a little bit of detergent. I've heard that you should not allow felting items to go through the spin cycle, but I haven't had any problems with these holders. Feel free to skip the spin cycle if you like. The basic point is that you need to get the holder down the size of the bottle. If you have the bottle on hand, use it to check the progress of the holder. I usually put mine in the dryer too, but again, this is optional. It can be left to air dry (perhaps stuffed with paper to hold the shape)

If you notice, some of the holders pictured are folded over at the top. This was because they were too tall for the bottles. I was able to get the grommets through two layers, but it was a little tough. I have altered the pattern to make the holders shorter, therefore folding shouldn't be necessary. 

Next step is to add the grommets. I find placing them a little lower is better. I use extra-large grommets, and 1 inch wide strapping (for the strap). I like to make the strap adjustable, so I use a plastic strap adjuster for that purpose. Wa-La...a new wool water bottle holder! The great thing about it is that it is a natural insulator! Enjoy! (If you are interested in a full step-by-step tutorial, please contact me. I won't bother if no one is interested!)

NOTE: I have never done a knitting pattern before for others to use, so be gentle with me if I don't do it exactly correctly. Experienced knitters should have no trouble following it (or making it up for themselves!) If you have any questions, please feel free to contact me, I'd be happy to help! 

ALSO: PLEASE DO NOT USE THIS PATTERN FOR SELLING WATER BOTTLE HOLDERS YOU MAY MAKE FROM IT. IT IS FOR PERSONAL USE ONLY. I F YOU ARE INTERESTED IN SELLING HOLDERS MADE FROM THIS PATTERN, PLEASE CONTACT ME. 

These particular holders have been in use for a few months now, and they are holding up very well. I noticed that the 27 oz holder (not pictured) really stretched out alot. I think it's the weight from the water dragging it down. I also think I needed to place the grommets a little lower, to offset the weight. I don't have pics of it, but  I will get some up soon.

And so there you go...my first pattern on this blog! And it's free! I hope someone else can enjoy it as much I have! (and I DO have a few of these all knitted up that I need to finish and list in my Etsy shop, in case anyone is interested in purchasing a ready-made one! Feel free to contact me to give me encouragement to get going on these!)


Wednesday, July 20, 2011

So Much to Catch Up On!

I realize I've been MIA for several weeks. Part of that was due to our get-away to the lovely state of Kansas to see my family, and partly because once we got back, I had a week to make a skirt for a wedding, including drafting and trying out the pattern first. Even now, I have a special event this weekend, but I did want to post at least a LITTLE bit of what I've been up to sewing-wise this past month or so:)

FIrst up...I'm always excited to share pics of things I've made...but when they are to be gifts and the receivers may possibly read this blog...I'm forced to hold back until after the gift has been given to post about them. Case in point: Leather Notebook Covers for my mom, sisters, niece and daughters. Whew...that was a lot of leather sewing! Thankfully my Baby (my old Kenmore sewing machine that was my inheritance from a very beloved aunt) was up to the task!

So, here's a few pics of the leather notebook holders!


I love the Heather Ross fabric on these! The dogs are just too cute! The two for my daughters are similar, but one is stitched in pink thread and the other in red. The back round on the fabrics is different too, since I was able to get different colorways of the same print. My niece's is stitched in orange. Thankfully the kids all seem to love them! The girls are all just old enough to appreciate a nice sized notebook for all their picture-making, story-writing adventures! Now, of course, the mini notebook I made for my 4 year old son, is not quite enough for him...he wants a big one like his sisters. And so I will make him one too. I might as well...

Next were the leather notebook covers for my mom and sisters. These are a smaller size. I am really happy with the results...now to make one for me!! i could really use it this weekend!


The backs all have my new "Vintage Ruth" labels on them...thanks to my super sweet friend Alanna, and her very computer-savvy, graphic-designer hubby! Thank you so, so much!!

 So, those are the notebooks covers. I'm pleased with them, but now need to make a few more.

Two last gifts for my niece...a water bottle holder and a door-sign. I know, don't they sound like very exciting gifts for a 6 year old? Well, they are at least practical (she has toys a plenty!)


The sign is hand-embroidered (in case it's hard to tell on the computer). I had a lot of fun doing it too (except the lettering...I found I stink at the satin stitch, LOL!) These embroidery hoop hangings are all the rage in blog-land, but this was my first time trying one out for myself. I would happily do more though!
And here is my adorable niece Libby, holding her notebook and wearing her water bottle holder. (The new 18 oz Klean Kanteen was part of the gift.) Since her cousins (aka, my kids!) all had water bottles and holders, I thought she might like to have one too, especially since we were planning a few outings while were there. And let me tell you...the Kansas heat can get to you after a few minutes of sun! Water is very necessary!

I'll do a separate post on the water bottle holders soon. There's too much to say and this post is already pretty big!

So, there's part of the fruits of my sewing labors the past month! I'll be back soon!

~Ruth

Monday, June 20, 2011

My Laundry Line Never Looked So Good!

To say the least, these gorgeous new fabrics make my line look awesome! (I wish I had spare just to leave hanging all the time, so that every time I look out the window, I'd catch a glimpse of them!)


Wondering what they are? (I say this for my family that reads this blog but don't have much interest in sewing themselves...) They are from Anna Maria Horner's new line LouLouThi. Yes, I adore her fabrics. This is her latest line. I love it. I want more of course, but for now, this is what I have. This fabric will be turned into pillow covers for our upstairs couch. I have wanted covers for the regular pillows ever since we got the couch (about 4 years ago), but had never gotten the perfect fabric for them. Now I have it. This is one project getting bumped up on the (very long) sewing list! I can't wait to make them!

Thanks for letting me share!
~Ruth

Tuesday, June 14, 2011

Just one of those days...

So, with the release of CraftSanity Magazine this week (and my pattern in it), I really wanted to have a few items for sale in my Etsy shop. However, my attempts at sewing yesterday did not yield the results I had hoped for. It was just one of those days. Nothing would work right. The pattern I was using (my own, and I've used it before...just a few days ago!) just wouldn't turn out the way it's supposed to. Finally, at 11:30 pm, I gave up and headed for bed, tears in my eyes as I looked at my sad attempts at sewing for the day. My dear sweet hubby tried to cheer me up and tell me that it all looked great, but I know the truth.

And now, it's the end of the school year (with all the picnics, graduations that it entails), we have a very busy week and next week I'll be prepping for our time with our family. So, sadly, I think it's quite possible that there will be no "stocking" at my shop this week. Maybe. I may attempt again if I can sneak down to my studio for a few minutes and sort out the troubles I was having yesterday. Or maybe I'll try making something else for the shop.

At any rate, I'm sure no one is "standing in line" waiting for me to stock my shop, however, I do apologize for my lack of getting things listed. Thank you for understanding. I truly do appreciate it!

I hope your day goes better than my sewing attempts yesterday!

~Ruth

Thursday, June 2, 2011

It's Coming!!

CraftSanity Magazine, Issue #3 (summer), is being printed as we speak! And I'm a featured designer in it! I can't hardly believe it!

If anyone is interested in knowing a bit more of my personal story behind getting this pattern published, read on! If not, my feelings won't be hurt! But I hope you enjoy the sneak peek again of the skirt that is soon-to-be released!


Anyone who knows me, knows that I love to sew and create new things. I've been doing it for years. Especially since buying my own sewing machine 11 years ago. Every time someone suggests I go into the sewing business, my answer is always about the same: I'm too busy. But maybe someday.

The "busy" comes in part from being a mom to three young kids. It also comes in part because I have other interests and pursuits that I feel are even more important than my own creativity. What it boils down to is that sewing has always been a hobby for me. Sewing things for my kids, filling the occasional request from a sister or friend, making gifts for loved ones, ect. This has kept my sewing time very filled! And I've always been happy to do it.

Recently however, I had the opportunity to meet in person the amazingly creative woman behind CraftSanity Magazine (and CraftSanity the blog) Jennifer Ackerman-Haywood. It turns out we grew up not only in the same town, but in the same NEIGHBORHOOD!! Seriously, only a few streets away!

Well, after I reveled in seeing the wonderful projects from Issues 1 and 2 of CraftSanity Magazine in person,  Jennifer asked what I sewed. I admit I have a hard time narrowing this down, because I sew a little of *everything*. But I happened to be wearing my latest creation of a skirt, and so showed her that. She liked it! I told her of my plans to draft another skirt, similar, but more suited to light and airy summer fabrics. She encouraged me to work up the pattern and submit it for the summer issue of the magazine.

I fully admit I worked under the wire on this! Not only was the deadline only a month away, but I had a prior commitment requiring a fair amount of my time for the month of April, and a deadline for another sewing project. Happily though, after a few "failed" attempts, I finally got a muslin I liked. Then  came the sample skirt to send in and then the pattern instructions...something I've never done before! All said and done, I was sending it off rather close to the deadline, but I made it, and it was accepted for the magazine!

And now, it's almost time! I just received word that the magazine is at the printers, and will be ready the  week of June 12th! Yay! Here's the info on Jennifer's blog about the summer issue. CraftSanity Magazine-Summer Issue!

And now you want to know the last reason why I have never gone beyond "hobby" stage with sewing? I hate to admit it, but I  am afraid of "rejection". I like people to like me and my work. Of course I know I shouldn't ever take it personally, but sewing and designing is so close to my heart, and such a part of who *I* am, that yeah, the idea of someone criticizing my work (or just not liking it) is a little scary to me. Also I see all the other SUPER talented seamstresses out there in blog-land and I get an inferiority complex. I fully realize that there is SO much I have yet to learn in the art of sewing and pattern design.

And so, that's it. I've overcome one of my biggest fears already...that I would submit a pattern to a magazine and not be accepted. Thank you Jennifer, for being the first person in the industry to give me a chance. I really cannot express my appreciation enough. Only time will tell how my Eight-Panel Corset Skirt will be embraced by the sewing world, but for now, I am one thrilled woman!

~Ruth

Sunday, May 29, 2011

Three Kyoko's and a Shower Curtain

When the Mezzanine fabric collection came out by Patty Young a few years ago, I was part of an active co-op that pre-ordered the fabric. I got a little carried away and ended up with 14 yards of fabric (two yards each of 7 different prints!). I had plans though. First to do with the fabric: Make Kyoko Dresses for my daughters and my niece. My nieces' dress came first.


My only "complaint" with the dress pattern is that the skirt is a little shorter than I would prefer. It's just at the knees. I like the girls' dresses to last more than one year if possible, so I lengthened the skirt on my daughters' dresses. My niece got the first dress, so hers is shorter. I would have altered hers if I had known. Three Kyoko dresses, wow! That was alot of work! But I still had plenty of left-over fabric! What to do next...?

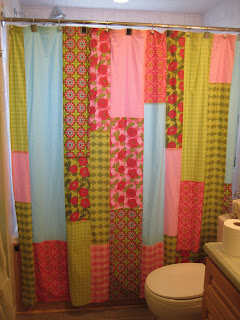
Our bathroom was in desperate need of a shower curtain. The vintage one that had been hanging, had water spots on it that didn't want to come out. I took it down to wash it (again), and this time refused to put it back up. Instead, I decided to use my left-over Mezzanine fabric to make a new curtain!


This curtain took a LOT of hours to create. Getting the lay-out just right was difficult (and stressful!). Then each seam is stitched and then serged for strength and durability. The hems are double folded and there is a hidden layer of canvas along the top where the grommets are to help the fabric lay nicely. I have no idea how many hours actually went into making this, but I'm sure glad I like it in the end! Did I mention I already have ideas for another curtain? (and it involves natural colored linen!)
That's all for now! Thanks for letting me share!
~Ruth

Wednesday, May 25, 2011

Little Leather Books

There's something about leather that has always entranced me. Perhaps it's the smell of it, or maybe the smoothness of it under my fingers. Or could it be the fact that it only gets better with age? Whatever it is, I truly do love leather.

One day a few years ago, my husband brought me home some scrap leather. I salivated at the mere sight of those gorgeous leathers! I was brainstorming ideas of all the wonderful things I could do with them before I even breathlessly said "thank you" to my dear sweet hubby! Brainstorm, yes. Cut into, no. It was a few years before I would muster up enough courage to cut into them. Finally, I did. And I'm so thankful too, because I found another "fabric" to love...leather.

One of the first projects I did was out of necessity. Being the old-fashioned girl that I am, I still carry around a notebook and pencil for all my to-do-lists, shopping lists, exchanging phone numbers and emails with friends, ect (you know, all the things that most people use their iPhones or Blackberry's for these days!) One tragic day this winter, I lost my little notebook with it's fabric cover. If I ever find a picture of it, I'll post it, but it was a gorgeous print from Anna Maria Horner's Little Folk's line (Buttoned Up, Sea), and it even had a little pencil holder on the spine, perfect for a mini mechanical pencil. I believe I lost it in the wintery slush in the Whole Foods parking lot, but that is beside the point, really. After a few weeks with no notebook, I could take it no longer. Quickly, I whipped up another one. This time using leather and fabric. While I loved the old cover, it was starting to show some wear and tear. This new leather one I'm quite certain will last a lot longer (provided of course I don't lose it again!) This little leather book is pictured on the left.


The new cover also sports a lovely hand-dyed silk bookmark ribbon sewn in, so I no longer need to search for my current page. The fabric used for the pencil holder is yes, more from Anna Maria Horner (I told you I love her fabrics!). This is just a scrap I had on hand. (yes, I have lots of scraps too!) The stitching is in a contrasting pink and I used the same scrap fabric to create the "flaps" for the notebook to slip into. The whole thing measures in at about 3 3/4" x 5". The perfect size to slip into a front pocket of a purse for easy finding.
The next little leather notebook is actually feeding my Sudoku obsession. I blame my older sister, Rachel. See, she has the gift for math and numbers, while I, quite frankly, don't. But I DO like a good challenge. She told me a few years ago that she really liked doing Sudoku puzzles. Once I figured out what they were, I decided to give it a try. Failure. But I don't necessarily give up easily. So, last summer, I bought a book right before our vacation and tried again. Success!! I was also addicted! Since then I've been known to stay up late doing puzzle after puzzle after puzzle. I also found it to be a good way to spend the time while I wait for my girls to get out of school. But I was tired of always searching the house for a good book, carrying them around, and trying to keep the pencil from falling out,  So, I decided to make my own smaller, more portable version. This little book was the result. Modeled after a plastic, hard-cased notebook I saw in the dollar store, the pencil keeps it closed when not in use. Here's some more pictures of it opened up:

So, the puzzles are cut out from a huge book of Sudoku that I have (there's 4 puzzles on each page). I cut the puzzles out individually and simply clip them together with a binder clip. The clip then slips into a slit I cut in the leather flap. Under the flaps on both sides is some cut up cardboard (from a cereal box) to make the book stiff. Once I finish a puzzle, I put it under the left flap. I keep planning to put the answer sheet folded up under the right flap, but I have't actually done that yet:).
But I think my favorite part of this book is the owl on the front. 

It is from Amy Schimler's On A Whim II fabric. It is actually stitched onto another piece of leather, which is then cut and stitched on to the front of this book. The reason for this is because my first attempt at making this book did not turn out so well, but the applique was adorable and I couldn't stand to just throw away that cute little owl! I think I actually like it this way better...it gives it more "texture". 

So, those are my little leather books. If there is any interest, I can try my hand at making a tutorial on how to make the sudoku book, and post the PDF pattern piece that I used to make it. It's sinfully simple to make and while I use it for Sudoku, the puzzles could also be swapped out for scrap paper to make a great list-making book. What a way to use up paper before sending it to the recycling center!
So, if anyone is interested in a free PDF pattern of this book, please leave a comment and I'll try to get one done! Thanks! (This might also include a little give-away!) Oh, and don't be intimidated by leather. It's actually quite simple to work with. I'll give all my tips in the tutorial. Also, I think these could be made from other materials, like wool felt, laminated fabric, see-through vinyl, brown paper (from grocery store bags) and even Tyvek envelopes. This just adds to the cool-ness of this project I think! I love options, don't you?! 

Thanks for letting me share!
~Ruth


Thursday, May 19, 2011

More Projects...Part 3

This post has to be short and sweet, as I don't have much time. But it's been a while and I don't want to loose steam in posting, so here it goes! 

Baby Carrier! A Half-buckle, padded waist, wrap Mei Tai, to be exact! Yes, no story of my sewing life would be complete without referencing some of the wonderful baby carriers that helped me keep my children close to me:) I think a full post (or two!) could be devoted to the many carriers I've made, but for now, this one will do. It's a lovely Didymos Hemp Indio that I dyed, then sewed into this carrier. I loved it! Since the resale on these kind of DIY carriers is low, I've kept it, though my babywearing days are mostly over.


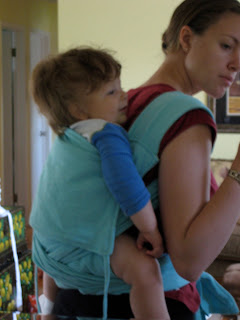
Here's Little Man and Myself. Oh, he was so much smaller then! What a big boy he is now! Can you see the chunk on his legs?! I LOVE fat baby legs!

I told you this had to be short, and it is. Sorry! I'll be back again soon!
~Ruth

Saturday, May 7, 2011

Playing "Catch Up" on Projects! Part 2

Ok, so again, in no particular order...some more past, completed projects! This is fun for me!

These skirts for my girls are more than 2 years old, but I still love them! C. is still wearing her big sister's skirt, so I still get to enjoy seeing it from time to time:)
 My, how they've grown since then! H. is SO tall now!

This bag, I made from a blank from Dharma Trading. There's two things I really love about this bag...it's roomy front pocket (my addition) and the adjustable strap (also my addition). The size is nice, but not overly huge. This was made 3 years ago. Last year, I made another one ( I had ordered two blanks, but had saved the second one for a while). I'll get to posting about that bag too. I did it a little differently, but I love it too! This bag still gets pulled out sometimes...not bad for a little cotton blank that's been in use for 3 years!

 I added a little stencil to the pocket. It says "LOVE" in Chinese. At least I hope that's what it says/}

For a while, I was in the "swing" of making Amy Butler's Swing Bag pattern:) This one was for my sister. She likes owls, and this print was super popular. 

 Just in case the Amy Schimler  owls were too kid-ish for her (I was nervous!) I decided to pair it with a very gorgeous Amy Butler print. I still love this fabric and some of it remains in my stash to this day. I always envisioned it as a skirt...
 Six years ago when my niece was born, I made her this hand-tied quilt. I loved it, my sister loved it. All was well. Until it started to fray at the seams. My sister gave it back to me to fix and shamefully, I let it sit for a very long time before I decided what to do with it.
 This was the result. The fraying was not really "fix-able", so the only thing to do was to reinforce all the seams. I chose some coordinating fabric, cut it into strips, pressed it all and stitched over the seams. I think I like it better this way:)
  These were gifts for my niece and a dear friends little boy. They are fold-up blankets with handles, paired with matching travel pillows. These blankets have been my go-to gift for kids for a while now. These were among my first, and since then, I've only made minor changes to them. Someday I'll make a tutorial on how to make them. They are so easy and beautiful! Not to mention practical! (In this picture, the blankets are folded up, hanging from the chair back. Opened up, they measure 25"x25")
 Another Amy Butler Swing Bag. This time for my little sister. This doubled as a going-away gift when she and her husband moved out-of-state...much to my dismay.
 The reverse: I added pockets on one side, with grosgrain ribbon at the top of the pockets
 The other side was left flat. I still love this print. Too bad I don't think I have any more of it left:(
And that's it for tonight! Stay tuned...more will be coming!